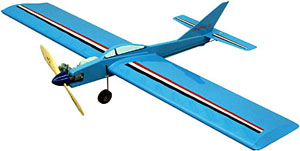
The Skyray 35 is a sport/trainer kit from Sig Manufacturing. It has a wing span of 44 inches, 396 sq. inches of area, lenght of 33 inches, and takes a .19 to .35 engine. Several members in my club recommended it as an easy to build, good flying airplane that would make a good trainer. Because this is my first Control Line model, I decided to build it according to the plans, with only slight modifications to make it better suited to my flying field. An excellent article available here covers more extensive mods if you're building one of these to fly in competition. Suggested retail is $58.49, but it is available from Sam's Stuff & Hobbies and others for around $48.00. Besides the kit, you'll need an engine, fuel tank and tubing, 2½" wheel, covering material, and misc hardware.
Before starting construction, I used the kit parts to make templates of everything so I could build another one without having to buy a second kit. The plans are helpful here as they show all parts and could easily be used to scratch build from. The instructions state the stock motor mounts are set up for a Fox Stunt 35 and need to be modified if running another engine. I found the stock mounts too narrow for the Stunt 35, but perfect for the OS LA 25 I'd decided to use. I did have to lengthen the motor cutout since the LA 25 is longer than the Stunt 35. When working with the ply fuselage doublers, it is much easier to shape the trailing edges BEFORE gluing them to the fuse sides. Because my flying field is grass, I angled the landing gear forward instead of to the rear as shown on the plans. This also allowed me to run the bolts for the landing gear clip throught the lower engine rail for greater strength. The only other mod I made to the fuselage was the tank mount.
The wing went together without much trouble. In my kit, the ribs weren't all identical. Four of them had a leading edge slot that matched the leading edge material perfectly and both spar slots cut correctly, while on the other four the leading edge slot wasn't quite right and the top spar slot wasn't cut deep enough. This is easily corrected if done before starting assembly. In addition, most of the ribs had a definate bow to them - again, not a show stopper (the instructions even mention this), but something to be aware of before starting construction. The spar slots in the ribs are a fairly loose fit, so if you are using cyanoacrylate (CA) adhesive to build the wing, it will have to be of the gap filling variety. After the wing is complete, it should be inspected it for gaps in any of the glue joints. They can be filled with balsa dust and a drop of instant CA.
The tail surfaces in my kit were made from very hard 1/8 inch balsa which would have been difficult to slot, so I decided to use cloth hinges instead of the ones provided in the kit. Monokote or sewn hinges would also work. The instructions tell you to put in a 1/4 inch offset when gluing the rudder to the vertical stab, but I installed mine straight and glued the entire assembly to the fuse at an offset. When installing the bellcrank, don't forget to glue the nut before adding the center section sheeting. The instructions say to use soldered-on washers to attach the pushrod to the bellcrank and control horn, but I used wire keepers from Brodak instead. Leadout wires were wrapped to the bellcrank according to the instructions. When gluing tha stab to the fuselage, make sure the elevator is neutral when the bell crank is neutral. This is adjusted by the position of the stab, and once it's glued there is no easy way to adjust it.
I covered the fuselage and tail surfaces with medium silkspan and water based urethane resin and sprayed them with white Rustoleum. If you use this method, you should know that not all Rustoleum colors are fuel proof. If in doubt, test first or use fuel proof dope. This is an easy way to get a shiny survace in a hurry - no trophy finish here, it's a trainer after all. It's a lot easier to paint the fuselage BEFORE attaching the wing. When assembling the wing and stabilizer to the fuselage, make sure they are square to the fuse from both front and top views. This is very important to the way your plane will fly. If there are gaps in the fuselage to wing joint, they need to be filled. I used 30 minute epoxy for this. The wing was covered with transparent blue Monocote after gluing it to the fuselage.
As mentioned before, the engine mount spacing was perfect for my OS Max LA 25. I mounted the engine with the 4-40 blind nuts included in the kit, but substituted hex head screws for the slotted ones included in the kit - strictly personal preference. The plans show a 4 oz. plastic tank attached using J-hooks and rubber bands. This works OK for a sport plane. My goal is to learn Control Line Precision Aerobatics, so my instructor suggested an adjustable tank mount. I also hate messing around with oily rubber bands. I used a Brodak 567 2½ oz. wedge tank and attached it to a thin plywood plate (reinforced and fuel proofed) with servo tape. The plate has a vertical slot at each end an attaches to the fuselage with 2 screws. Simple and effective. After assembling everything, check the balance point. This is extremely important. Add weight as necesary to make it balance where the plans say it should. Mine came out a little nose heavy.
If this is your first plane, I highly recommend getting help from an experienced flyer for your first flights. The first flight was FAST, the controls were hair-trigger, and it flew for a good 10 minutes on a tank of fuel. Thank goodness I wasn't flying it - no doubt in my mind I would have crashed it. On the second flight, we richened up the engine to slow it down and I flew it, but controls were still hair trigger. After this flight, I decided to wait for my instructor before flying again. He adjusted the line spacing at the handle and the Skyray tamed right down. Line tension wasn't great, but the engine was running really rich and the plane was flying a little too slow. It is very stable and goes where you point it, not twitchy at all (once the handle is adjusted:). My instructor said the tip weight is a little too much (it's not adjustable) for aerobatics, but just about right for a trainer. All I did was basic climbs and dives, but my instructor put it through some manuevers and said it handles fairly well for a small plane.
Since I've flown my Skyray quite a bit since I first wrote this review, I have some additional insights I'd like to add. First, when tempuratures get hot, the air in Reno really thins out which has a big negative on the way it flies. Second, I don't like my tank set up, because about half way through the flight, the motor leans out and the plane speeds up quite a bit. After posting on SSW and getting lots of good advice, I think there 3 issues that can be addressed to improve the flying characteristics of the Skyray: wieght, lift, and thrust. I am currently building a second Skyray to address each of these. I'm cutting weight by substituting balsa ribs and spars for the plywood and spruce parts included with the kit. I'm also doing more sanding and lightening holes and being more careful with the finish. Lift is being addressed by increasing the wing span by 2 inches and adding fixed flaps (larger wing should produce more lift, no?). I also might use the Brodak Shark 402 airfoil, which has the smae thickness and chord as the Skyray 35 but is slightly blunter. As for thrust (and consistancy), I'm going to run a 10-4 prop instead of the current 9-4, and switch to a uniflow tank. In a couple of weeks I hope to be able to report on any changes in flight characteristics.
I was able to resolve my tank setup by running muffler pressure to the fill tube and blocking the overflow. Engine runs are much more consistant. I've since moved the LA 25 to a new, modified Skyray, replacing it with an FP 20. At 5000' or so, the FP 20 is marginal for the Skyray when trying to get a good Stunt run, but I'm still playing with different props. After flying the new inproved Skyray quite a bit, I have to say I like the way the stock airplane flies better than the "improved" version. If you build one of these, I recommend leaving it stock except for adding a two wheel landing gear.
The Skyray 35 is an easily built, moderately priced entry into Control Line Flight. I feel it could be successfully built by a beginning modeler provided they pay attention to detail. It would benefit a lot from the accuracy of laser cut parts. All in all, I'm happy with the combination. The LA 25 is a dream, giving easy hand-flip starts and consistant runs.