This is a review which I have been looking forward to for some time - which sounds like a recipe for disaster - and I can honestly say that I am not in the least disappointed. The problem with many kit reviews is that you never end up with quite the model you might have chosen if you were given a completely free choice. In this case, I was at the point where I had a need for a small, agile, easily repairable model to try some of the new things which were becoming possible due to the arrival of the new programmable transmitters and Curtis Youngblood!
The 'Space Baron' immediately proved itself to be exactly what I needed and I hope to bring you a detailed account of my adventures in the near future.
Meanwhile...
There are, in fact, two versions of the 'Space Baron' available:
1. An almost ready to fly (ARTF) version, and
2. A complete assembly kit.
I believe that both versions are available with, or without, an engine fitted; the review example supplied was an ARTF model fitted with a Webra 0.28 cu.in. helicopter motor. The manual supplied includes detailed instructions for both the ARTF version and the full kit version, which is a useful reference when you need to work on the ARTF model.
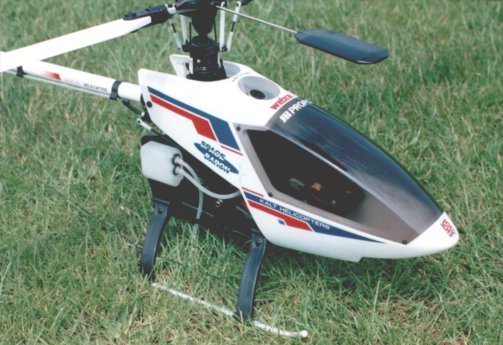
As is becoming standard with small helicopters, the model is supplied in a box which can be used as a carrying box if this becomes necessary. The complete tailboom assembly lies in the bottom of the box - with the tailplane turned sideways - as does the assembled rotor head, with the complete front end/cabin assembly above it. The undercarriage is separate and consists of two assemblies for left and right sides. Add a set of rotor blades, a decal sheet and the aforementioned manual and there you have it.
Assembly of the helicopter consists of installing the tailboom assembly, bolting on the undercarriage and rotor head, trimming the canopy to fit and adding the decals. All of which takes about an hour and a half.
Ah, but whats this? A separate sheet advising you to lubricate various parts and to check that the fan shroud and starter cone are correctly fitted.
Well now, let's be honest, I really would have preferred the full kit version myself, since it would have given me the satisfaction of actually making the thing. That extra sheet provided just the excuse I needed so, before installing the radio gear, I proceeded to dismantle and re-assemble the entire model. Very satisfying, but I'm afraid I cannot give you any idea of how long it might take to start from scratch.
The exercise was well worth while because there was no lubrication on any of the parts which the manual tells you to grease - although there was some form of very light oil in most of the bearings - and no threadlock anywhere! Having finished the job, the whole model was much quieter and free running, although I must add that it was very quiet and free to start with.
Whether this exercise was actually necessary is hard to say, the form of construction, and the materials used, are such that I am sure you could take a model straight out of the box and fly it without any problems. No doubt most purchasers will do that anyway.
The only other job needed to finish the model is to balance and cover the rotor blades. These are of the usual composite wood construction, but with the addition of some sort of heavy plastic material along the outer two thirds of the blade length. This replaces one of the hardwood laminations and, as originally supplied, was in line with the blade fixing bolt. More on this later. The covering supplied is 'Profilm', which is a self adhesive film which can be further bonded by adding heat. This is long enough to cover about 90% of the blade length; the intention being to leave the root area uncovered.
On completion, I was rather surprised to find that the blades weighed almost 4 ounces (123 gm) - about the weight of a standard set of Heim blades! This was compounded by the fact that I actually had some trouble balancing the original blades and they acquired a lot of trimming tape before covering. This is purely luck, of course, and a slightly different set of blades supplied later were virtually spot on. These are lighter and have a more forward CG
One useful fact about the re-assembly job is that I can tell you just how it is constructed. This has a number of interesting and novel features, notably the planetary drive system. Starting from the motor, the ball-raced clutch, with integral drive pinion, is fitted directly to the crankshaft, followed by the fan and starter cone. The whole assembly is canted forwards to facilitate the application of the starter.
The pinion and main drive gear have tapered teeth to give a skew drive to the vertical mainshaft. The ratio here is only 2 or 3 to 1 which gives lots of tooth area in contact and light loadings. The main gear has a conventional bevel drive take-off to the tail drive shaft. Inside the main gear is a ring gear which drives 3 planetary gears which, in turn, drive the planetary carrier, which incorporates the autorotation clutch.
This results in a smooth quiet reduction assembly which is enclosed in a moulded case. An article in an American magazine recently stated that the Kalt 'Enforcer', which is available over there is different to the 'Space Baron' in that the planetary gears are fitted with roller races to avoid chatter. I can confirm that the 'Space Baron' gears also have roller races.
The tail drive shaft has three bearings in the tailboom and has 'loop-in-slot' couplings at each end, so you can remove either the boom or the tail gearbox without having to fiddle about with grubscrews. Tail gearbox is very conventional but it has plastic gears, like the rest of the machine.
Two plastic side frames, separated by various spacers, bolt on the sides of the main gearbox. These are moulded to enclose the tank at their rear, which makes this unit very visible. They also have bearings for the pitch arm assembly which raises and lowers the pitch rod, which passes up the centre of the hollow mainshaft. The previously mentioned separate undercarriage units are held to each side frame by self tapping screws.
A servo frame, which holds five servos and a switch harness is mounted between the side frames at its base and is canted forwards at the same angle as the motor and retained at the top by two arms which pass around the fan shroud. This, together with one bolt, effectively retains the fan shroud in position, but allows some movement. Depending on the motor used, it may be necessary to trim the shroud to fit. With the Webra fitted it is necessary to remove some material on the exhaust side. A little trimming of the upper locating pegs on the aforementioned arms also helps.
The swashplate drive system is mounted on a collar which is clamped around the top of the main gear casing. This allows the whole assembly to be offset to compensate for any phasing problems which may occur. It also retains the swashplate in position means of a 3 point suspension - the swashplate does not move (no CCPM!). A description of the mixer/washout system is beyond the scope of this review, but it moves up and down for collective control and tilts for cyclic inputs. The flybar is in the same plane as the blades.
Design of the rotor head is quite intriguing. It has two lead/lag hinges (is this a first?); one in the blade bolt in the usual way and the other on the blade axle. The axles are attached via individual flexible plates which are surprisingly soft - the blades droop quite noticeably at rest
Five servos are accommodated in a frame which has adjustable plates to allow for a variety of servos. This then forms a box with 3 servos (Elevator, Pitch and Throttle) on the left side and 2 on the right (Aileron and Rudder). The remaining space on the right is filled by a plate which accepts the on/off switch (but no charge socket) and has a cut-out for the wiring to emerge. It seems that the intention here is that excess wiring is stored in the space between the servos. This does depend on the servos used. JR NE517's were used on the review model and these just about fit without touching back to back. Some care was needed to squeeze all the wiring in without crushing.
Lengths are given for all the linkages and these are fairly accurate. All of these are very direct and give very precise operation. 'Z' bends are supplied for the servo ends. These give satisfactory operation, with care, but I would have preferred ball joints or clevices.
It was becoming apparent at this point that some difficulty was going to be experienced with obtaining a CG location anywhere near the mainshaft. All of the major assemblies are located in front of the shaft, with very little behind it to compensate. In fact, the review model balanced slightly nose down, when supported by the flybar, with no battery fitted. My temporary solution for this was to fit a 700 mAH battery on top of the servo frame. The model flies reasonably in this configuration but really needs some tail weight for ideal results.
A plate is provided to mount the gyro directly under the mainshaft and a transparent plastic cover is included. In this location, the wiring can be quite tricky as it has to pass the engine and circumnavigate the fan shroud. I gave some thought to mounting the gyro at the rear to help with the CG location, but decided to adopt my standard kit review policy and mount it as advised to start with. The unit used is a Morley 'Competitor', which will form the subject of a separate review.
I set the model up a little differently to that described in the manual. The recommendation is to set all the blade linkages to central, parallel or horizontal and then set the blades to 4 to 5˘ pitch. I set the blades to zero so that I could use my PCM 10 to give whatever pitch range I required. With this set-up the pitch limits are at least Ť10˘. This only works if you have a suitable radio.
With the equipment described (5 servos, receiver, 700 mAH battery, gyro, Webra 0.28, special silencer and 4 ounce blades), the all-up weight came out at exactly 6 lb.
The tank is supplied ready assembled with a filter and fuel shut-off clamp incorporated in the feed line. Regular readers will be aware that I regard an onboard filter as disaster looking for a place to happen, so this was removed. There is only one vent, which means that you have to fill through the feed pipe, anyway. This means that any s**t (SILT, dummy) in the fuel will be trapped on the wrong side of the filter!
Construction of the tank is interesting. Both feed and vent pipes are nylon mouldings which are fitted into rubber grommets which fit into holes in the tank. The klunk line is sensibly arranged so that the weight is in the middle of the tank to give a feed from most attitudes. However, the klunk has the usual taper which means that the pick-up is a little above the tank floor. Likewise, the vent is positioned a little below the tank top. Let's face it - it takes a real genius to design a tank which cannot be completely filled, or emptied! When Kalt first produced the little shut-off clamp. I bought some and they included a plate to mount it to the model. I found one of these and used it to mount the clamp onto the side plate and act as a retainer for the vent line. Squeeze it shut when you've finished and it won't drip on your trousers!
Included with the review kit was a new silencer made specifically for this model. This is intended to fit all of the motors which might be used and has a rather small hole in the motor flange which you may feel needs matching to the motors exhaust. I did try it - it's quite hard work and appears to give no improvement whatever! Likewise, applying a drill to the rather small outlet only increases the noise slightly. I suggest you leave it alone and invest in some nitromethane.
It took less than one tank of fuel for me to become very impressed with the Webra motor! I adopted my usual procedure of removing the rotor head for the first run. After an almost instantaneous start, a slight richening of the idle mixture was all that was required to produce a superb tickover and it hasn't been touched since.
Before that tank of fuel was exhausted, I had the model flying and the blades tracked. Two things were immediately clear:
a) The clutch engaged very late.
b) The poor little motor was really struggling to wind up those heavy blades.
I rather liked the late clutch operation but there is now an uprating kit available which spaces the shoes out a little to give an earlier engagement and prevent premature failure of the shoes due to fatigue.
Once the motor is wound up, it can cope alright except in violent aerobatics, when the blades load up in the air. This is not a serious problem and will probably never bother most purchasers. I have now received a later set of blades with are a little over 3.5 ounces (102 gm) and have a more forward CG (29% against 36% by my crude measuring system). I assume that these are now standard. The original blades are quite good for autorotations!
The tail is very, very powerful! I really thought that something serious was amiss until I tried the shortest arm available on the rudder servo. It will still do instantaneous pirouettes, but at least it's now manageable. I actually learned something from this: I have been running my gyro's at far too high a gain, which has made it difficult to do pirouettes!
With the maximum available cyclic movement, the hover is very smooth and stable, yet aerobatics are no problem (it won't do 'Youngblood flips' in this form). Loops are easy - both single and consecutive - and it will roll all day if you are good enough. I have been practising my switchless inverted (there is a trim change - but more on that anon) and have done my first outside loop, and it's still in one piece.
At the time of writing I have yet to try the later, lighter, blades. I also have the new thrust-raced up date of the blade holders fitted (Ł14-95 from your dealer) and will comment when I have more airtime. By the time that you read this, there should be a tuned pipe available.
It's everything that I hoped - and more. The cone start is just about the most convenient system yet (no extension needed) and the tank is highly visible. I like the styling too, it does far more for me than certain other similar models.
I do have some misgivings about the very hefty blades and the rather soft flexible plates. Likewise, the blade holders are held together by just two screws and retained by one 3mm bolt - as are the blades. This is no different, of course, from other models on the market and I'm sure that Kalt have done their homework. I have heard comments about the abundance of self tapping screws used in it's construction. These all go in a very long way and I have no problems with the idea. I have used PK screws to hold motors onto wooden bearers for years with no problems.
I like it, It really does reach the parts that other helicopters cannot (hic!).